Setting up Google Fi eSIM iPhone 16 can be quick, but only if you follow the right steps. Many users get stuck on “Activating…,” have trouble scanning the QR code, or find that mobile data won’t connect after setup. In fact, according to Google Fi updates, over 70% of new Fi activations in 2025 are done with eSIM instead of a physical SIM, showing how fast this change is happening. The good news is that Google Fi supports eSIM on all iPhone 16 models, and you can complete activation in just a few minutes. In this guide, you’ll learn the fastest ways to install your Fi eSIM using the app, QR code, or manual entry. We’ll also cover post-activation checks, common errors, and quick fixes to keep your connection running smoothly.

What you need before you start
Before activating your Google Fi eSIM iPhone 16, make sure everything is ready. First, update your iPhone 16 to the latest iOS version and confirm the device is unlocked. You’ll also need a stable Wi-Fi connection during setup and enough battery life to finish the process without interruption.
Next, sign in with the Google Account linked to your Fi service. Have a second device, such as a laptop or tablet, ready if you plan to activate using a QR code. Finally, locate your iPhone’s IMEI number under Settings → General → About, since Fi may request it for verification.
🌍 Stay Connected Beyond Google Fi eSIM
Looking for flexible global coverage and instant setup? Gohub offers affordable eSIM plans in 190+ countries — perfect for iPhone travelers.
Start in the Google Fi app (fastest path)
The quickest way to activate your Google Fi eSIM iPhone 16 is through the official Google Fi app. Download it from the App Store, open the app, and sign in with your Google Account. Once logged in, choose the option to Set up eSIM.
The app will automatically push the eSIM profile to your iPhone. Keep Wi-Fi turned on and stay on the activation screen until the status changes to Activated. If the push installation fails, don’t worry — you can switch to the QR code method or enter the eSIM details manually in the next steps.
Activate via QR code (most reliable)
If the app push fails or doesn’t appear, the QR code method is often the most reliable way to activate your Google Fi eSIM on iPhone 16.
Step 1: Get your QR code
- On a second device such as a laptop, tablet, or another phone, log in to your Google Fi account.
- Go to the eSIM activation section and request a QR code. The code will appear on the screen or be sent to your registered email.
Step 2: Scan the code on your iPhone 16
- On your iPhone, open Settings → Cellular → Add eSIM → Use QR Code.
- Point the camera at the QR code on your other device.
- The plan information should load automatically, showing your Google Fi line.
Step 3: Confirm activation
- Tap Continue and wait until the status changes to Activated.
- Keep Wi-Fi on during this step to avoid interruptions.
Tips if the QR code doesn’t work
- Increase the screen brightness of the device displaying the QR code.
- Hold the camera steady or zoom in slightly if it doesn’t focus.
- If scanning still fails, try printing the QR code for a clearer image.
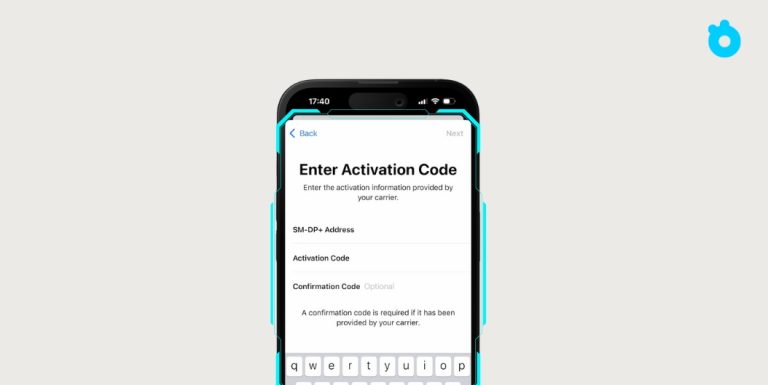
- As a last resort, choose Enter Details Manually and input the SM-DP+ address and activation code from Google Fi.
With this method, most users complete activation in just a few minutes, and the eSIM is ready for calls, texts, and data.
Manual entry (backup method)
If both the app push and QR code methods fail, you can still activate your Google Fi eSIM iPhone 16 by entering the details manually. This process takes a little longer but works reliably when other options don’t.

Step 1: Find your activation details
- Log in to your Google Fi account on a second device.
- Look for the eSIM activation information, which usually includes the SM-DP+ address and an Activation Code.
- Copy these details carefully — every character must match exactly.
Step 2: Enter details on your iPhone 16
- Open Settings → Cellular → Add eSIM → Enter Details Manually.
- Paste or type in the SM-DP+ address and Activation Code.
- Tap Next and wait while your iPhone contacts the Fi server.
Step 3: Confirm activation
- After a short delay, you should see the eSIM status change to Activated.
- Keep your Wi-Fi connection active during this step to avoid timeouts.
Tips for a smooth setup
- Double-check that you’re using the correct IMEI (preferably IMEI 2 for eSIM on iPhone 16).
- If activation hangs, restart your phone and retry.
- In rare cases, you may need Google Fi support to reprovision your eSIM profile.
This method is slower but ensures you can still use your Google Fi eSIM even if scanning or automatic setup fails.
Post-activation checklist (don’t skip)
Once your Google Fi eSIM iPhone 16 shows as Activated, there are still a few important steps to finish setup and avoid connection problems later.

Step 1: Set your default lines
- Go to Settings → Cellular.
- Choose which line handles Voice Calls, iMessage & FaceTime, and Cellular Data.
- If you only use Google Fi, set it as the default for all options.
Step 2: Enable Data Roaming
- In Cellular Data Options, switch on Data Roaming for the Fi line.
- This is essential for consistent data access, especially if you travel.
Step 3: Update carrier settings
- Navigate to Settings → General → About.
- If a pop-up for Carrier Settings Update appears, tap Update. This ensures the latest network optimizations are applied.
Step 4: Enable 5G
- Go to Settings → Cellular → Cellular Data Options → Voice & Data.
- Select 5G Auto or 5G On for the best speed and coverage.
Step 5: Run a quick test
- Open Safari or any app that needs internet.
- Place a test call and send a text to confirm voice and SMS are working.
Completing this checklist guarantees your eSIM is fully functional and ready for daily use.
Quick Transfer & moving from Android
Apple gives iPhone 16 users multiple ways to move their number when switching to Google Fi eSIM.
Quick Transfer from another iPhone
- If your old iPhone already uses a Google Fi eSIM, place both phones close together.
- On the new iPhone 16, go to Settings → Cellular → Add eSIM → Transfer from Nearby iPhone.
- Follow the on-screen instructions to copy your existing eSIM profile.
- Confirm on both devices, and within minutes the eSIM should be active on your new phone.
Transfer from Android to iPhone 16
- iOS 17 and later adds support for moving an eSIM from Android to iPhone.
- On your iPhone 16, go to Settings → Cellular → Add eSIM → Transfer from Android.
- On your Android device, open the eSIM transfer option (location varies by manufacturer).
- Scan the code displayed on your iPhone to complete the process.
When Quick Transfer doesn’t work
- If either transfer option fails, request a new eSIM profile from Google Fi through the app or website.
- Activating a fresh eSIM often resolves conflicts and ensures a clean setup.
Using these methods saves time and avoids the need to re-enter activation codes.
Common errors & 60-second fixes
Even with the right steps, some iPhone 16 users run into problems while setting up Google Fi eSIM. Here are the most common issues and quick solutions you can try in under a minute:
Stuck on “Activating”
- Restart your iPhone.
- Toggle Airplane Mode on and off.
- Check for a Carrier Settings Update in Settings → General → About.
- If the issue continues, remove the eSIM and reinstall, or contact Fi support to reprovision your line.
No mobile data
- Make sure the Fi line is selected as your Cellular Data line.
- Turn on Data Roaming in Cellular Data Options.
- Check APN settings in case they need to be updated for Fi.
QR code won’t scan
- Increase the screen brightness of the device displaying the code.
- Hold the camera steady or try printing the QR code.
- If scanning fails, switch to manual entry.
App conflict
- Some users report smoother setup after uninstalling the Google Fi app, adding the eSIM through Settings, then reinstalling the app afterward.
IMEI error
- Use IMEI 2 for eSIM activation on iPhone 16, since IMEI 1 is often linked to the physical SIM slot.
With these quick fixes, most activation problems can be resolved without needing a support call.
Plan tips for iPhone users (2025 update)
Once your Google Fi eSIM iPhone 16 is activated, it’s worth knowing which Fi plans fit best for iPhone users in 2025.
Unlimited Essentials — $35/month
- Great for single-line users who need plenty of data without extras.
- Includes unlimited calls and texts, with data prioritized up to a set threshold.
Flexible & Unlimited Plus
- Flexible: pay per GB, ideal if you use light data or mostly Wi-Fi.
- Unlimited Plus: better for heavy users, includes high-speed hotspot data and international roaming perks.
Voicemail & iOS integration
- Visual voicemail is now built directly into the Phone app on iOS, so you no longer need to manage voicemail through the Fi app.
- This makes eSIM on iPhone 16 more seamless, since calls and messages stay in Apple’s native apps.
Pro tip: Always review your actual monthly data use in the Fi app before choosing a plan — upgrading or downgrading is quick and can save you money.
FAQs: Google Fi eSIM on iPhone 16
Does Google Fi support eSIM on iPhone 16?
Yes. All iPhone 16 models are fully compatible with eSIM, and Google Fi lets you activate directly through the app, QR code, or manual entry.
How do I get a QR code for Google Fi eSIM?
Log in to your Google Fi account on another device. You’ll see an option to generate a QR code for eSIM activation, which you can scan on your iPhone 16.
Can I transfer my Google Fi eSIM from Android to iPhone 16?
Yes. With iOS 17 and later, you can use the Transfer from Android option in Settings → Cellular → Add eSIM. If it doesn’t work, request a new eSIM profile from Fi.
Why is my Google Fi eSIM stuck on “Activating”?
This usually fixes after restarting your iPhone, toggling Airplane Mode, or checking carrier updates. If not, reinstall the eSIM or ask Fi support to reprovision your line.
How do I enable 5G after setting up Google Fi eSIM?
Go to Settings → Cellular → Cellular Data Options → Voice & Data and choose 5G Auto or 5G On.
Final tips for travelers
Activating Google Fi eSIM on iPhone 16 is usually quick once you follow the right method — whether through the app, QR code, or manual entry. After setup, remember to check your carrier settings, enable 5G, and run a quick test call or data session to confirm everything works.
For frequent flyers or anyone who wants instant connectivity abroad, it’s smart to compare travel eSIM plans that fit your destination and budget. With the right plan, you can avoid roaming fees and enjoy seamless coverage from the moment you land.
Related Articles
- How to Receive SMS on eSIM iPhone – Fixes and settings when your eSIM is active but won’t receive text or OTP.
- iPhone 16 eSIM Support – What’s new with eSIM on iPhone 16: profile limits, coverage, and improvements.
- Reset eSIM on iPhone – Step-by-step guidance to reset or reinstall your eSIM profile when problems persist.
- How to Use Airalo eSIM on iPhone – A full guide to setting up and using Airalo’s travel eSIM on your iPhone.
- iPhone eSIM Compatibility – Quick way to check whether your iPhone supports eSIM.
- Simple Mobile eSIM iPhone 15 Activation – Instructions specific to activating Simple Mobile eSIM on iPhone 15.